Build a Personal Homepage from Scratch in 3 Days: Astro + Cloudflare Pages, Zero-Cost Deployment
1/25/2026
Preface: the best way to record your technical growth
As a developer, I always wanted my own space to record technical notes, share project experience, and showcase learning outcomes. I wrote many articles, but they were scattered across platforms. I built interesting projects, but there was no unified place to show them.
Then I discovered Astro, a modern static site generator that let me build a professional, beautiful, full-featured personal site in less than a day. It supports blogs, projects, and resumes, and most importantly, deployment and maintenance are simple. Today I am sharing the full practical guide.
Why Astro + Cloudflare Pages?
Before we start, here are the benefits of this stack:
Astro core advantages:
- Zero JavaScript by default, excellent performance
- Supports React, Vue, Svelte, and more
- Built-in Content Collections with type safety
- MDX support to use components inside Markdown
- SEO-friendly, auto sitemap
Cloudflare Pages strengths:
- Free static hosting with unlimited bandwidth
- Global CDN (290+ PoPs)
- Automatic HTTPS
- GitHub/GitLab integration with auto deploy
- Edge functions support for extensibility
- Zero-config cold starts, deployment in seconds
This combo gives you modern dev ergonomics with zero-cost global deployment and strong performance.
Step 1: Project initialization
Create a new Astro project:
# npm
npm create astro@latest

# pnpm
pnpm create astro

# yarn
yarn create astro
In the interactive installer:
- Choose “Include sample files” and pick “Blog”
- Choose “Install dependencies”
- Choose “How do you plan to deploy?” and select “Cloudflare Pages” or “Other”
Enter the project directory:
cd your-project-name
Step 2: Configure project metadata
Open astro.config.mjs:
import { defineConfig } from 'astro/config';

export default defineConfig({
  site: 'https://your-domain.com',  // replace with your domain or Cloudflare Pages default domain
  base: '/',  // usually root for Cloudflare Pages
  integrations: [
    // add integrations later
  ],
});
Notes:
- Cloudflare default domain format:
your-project.pages.dev - For custom domains, add the domain in Cloudflare and configure DNS
baseis usually'/'unless you have a special path
Step 3: Personalize your homepage
1. Edit the homepage content
Edit src/pages/index.astro:
---
import Layout from '../layouts/Layout.astro';
---

<Layout title="gfish Homepage">
  <main>
    <h1>Hello, I am Zhang San!</h1>
    <p>Full-stack engineer | Open-source enthusiast | Tech blogger</p>

    <section class="projects">
      <h2>My Projects</h2>
      <ul>
        <li>
          <h3>Project 1: XXX</h3>
          <p>Project description...</p>
          <a href="project-link">View details</a>
        </li>
        <!-- more projects -->
      </ul>
    </section>

    <section class="skills">
      <h2>Tech Stack</h2>
      <p>JavaScript, TypeScript, React, Vue, Node.js...</p>
    </section>
  </main>
</Layout>

<style>
  main {
    max-width: 800px;
    margin: 0 auto;
    padding: 2rem;
  }
  h1 {
    font-size: 3rem;
    margin-bottom: 1rem;
  }
  section {
    margin: 3rem 0;
  }
</style>
2. Add blog content
Create .md or .mdx files in src/content/blog:
---
title: "My First Blog Post"
description: "This is the summary"
pubDate: 2025-01-25
tags: ["Astro", "Frontend"]
---

# Body

Your blog content goes here with full Markdown support.
3. Create a blog list page
src/pages/blog/index.astro:
---
import { getCollection } from 'astro:content';
import Layout from '../../layouts/Layout.astro';

const allPosts = await getCollection('blog');
const sortedPosts = allPosts.sort((a, b) =>
  b.data.pubDate.valueOf() - a.data.pubDate.valueOf()
);
---

<Layout title="Blog List">
  <main>
    <h1>My Blog</h1>
    <ul>
      {sortedPosts.map(post => (
        <li>
          <a href={`/blog/${post.slug}/`}>
            <h2>{post.data.title}</h2>
            <p>{post.data.description}</p>
            <time>{post.data.pubDate.toDateString()}</time>
          </a>
        </li>
      ))}
    </ul>
  </main>
</Layout>

4. Create a blog detail page
src/pages/blog/[slug].astro:
---
import { getCollection } from 'astro:content';
import Layout from '../../layouts/Layout.astro';

export async function getStaticPaths() {
  const posts = await getCollection('blog');
  return posts.map(post => ({
    params: { slug: post.slug },
    props: { post },
  }));
}

const { post } = Astro.props;
const { Content } = await post.render();
---

<Layout title={post.data.title}>
  <main>
    <h1>{post.data.title}</h1>
    <p>{post.data.description}</p>
    <time>{post.data.pubDate.toDateString()}</time>
    <hr />
    <Content />
  </main>
</Layout>

Step 4: Make it look good
Use Tailwind CSS
Install Tailwind CSS:
npx astro add tailwind
Use Tailwind classes in components:
<div class="container mx-auto px-4">
  <h1 class="text-4xl font-bold text-center my-8">
    Welcome to my homepage
  </h1>
  <div class="grid grid-cols-1 md:grid-cols-2 gap-6">
    <!-- project cards -->
  </div>
</div>
Add dark mode
Create src/layouts/Layout.astro:
---
interface Props {
  title: string;
}

const { title } = Astro.props;
---

<!doctype html>
<html lang="zh-CN">
  <head>
    <meta charset="UTF-8" />
    <meta name="viewport" content="width=device-width" />
    <title>{title}</title>
  </head>
  <body>
    <slot />
  </body>
</html>

<style is:global>
  :root {
    --bg-color: #ffffff;
    --text-color: #1a1a1a;
  }

  html.dark {
    --bg-color: #1a1a1a;
    --text-color: #ffffff;
  }

  body {
    background-color: var(--bg-color);
    color: var(--text-color);
    transition: background-color 0.3s, color 0.3s;
  }
</style>
Add a toggle button:
<script>
  function toggleDark() {
    document.documentElement.classList.toggle('dark');
  }
</script>

<button onClick="toggleDark">
  Toggle theme
</button>
Step 5: Deploy to Cloudflare Pages
1. Create a GitHub repo
Create a new repo on GitHub:
- Repo name:
your-project-name(e.g.personal-homepage) - Public
- Optional README
2. Configure build scripts
In package.json (if not already):
{
  "scripts": {
    "dev": "astro dev",
    "start": "astro dev",
    "build": "astro build",
    "preview": "astro preview"
  }
}
If you use Pagefind:
{
  "scripts": {
    "dev": "astro dev",
    "build": "astro build && pagefind --site dist --output-path dist/pagefind",
    "preview": "astro preview"
  }
}
3. Create wrangler.toml
At the project root:
# Cloudflare Pages config
# Docs: https://developers.cloudflare.com/pages/platform/build-configuration/

name = "your-project-name"
compatibility_date = "2024-01-01"

[site]
bucket = "./dist"

[build]
command = "npm run build"
cwd = ""

[build.upload]
format = "service-worker"

[env.production]
PUBLIC_ALLOW_INDEX = "1"

[env.preview]
PUBLIC_ALLOW_INDEX = "0"
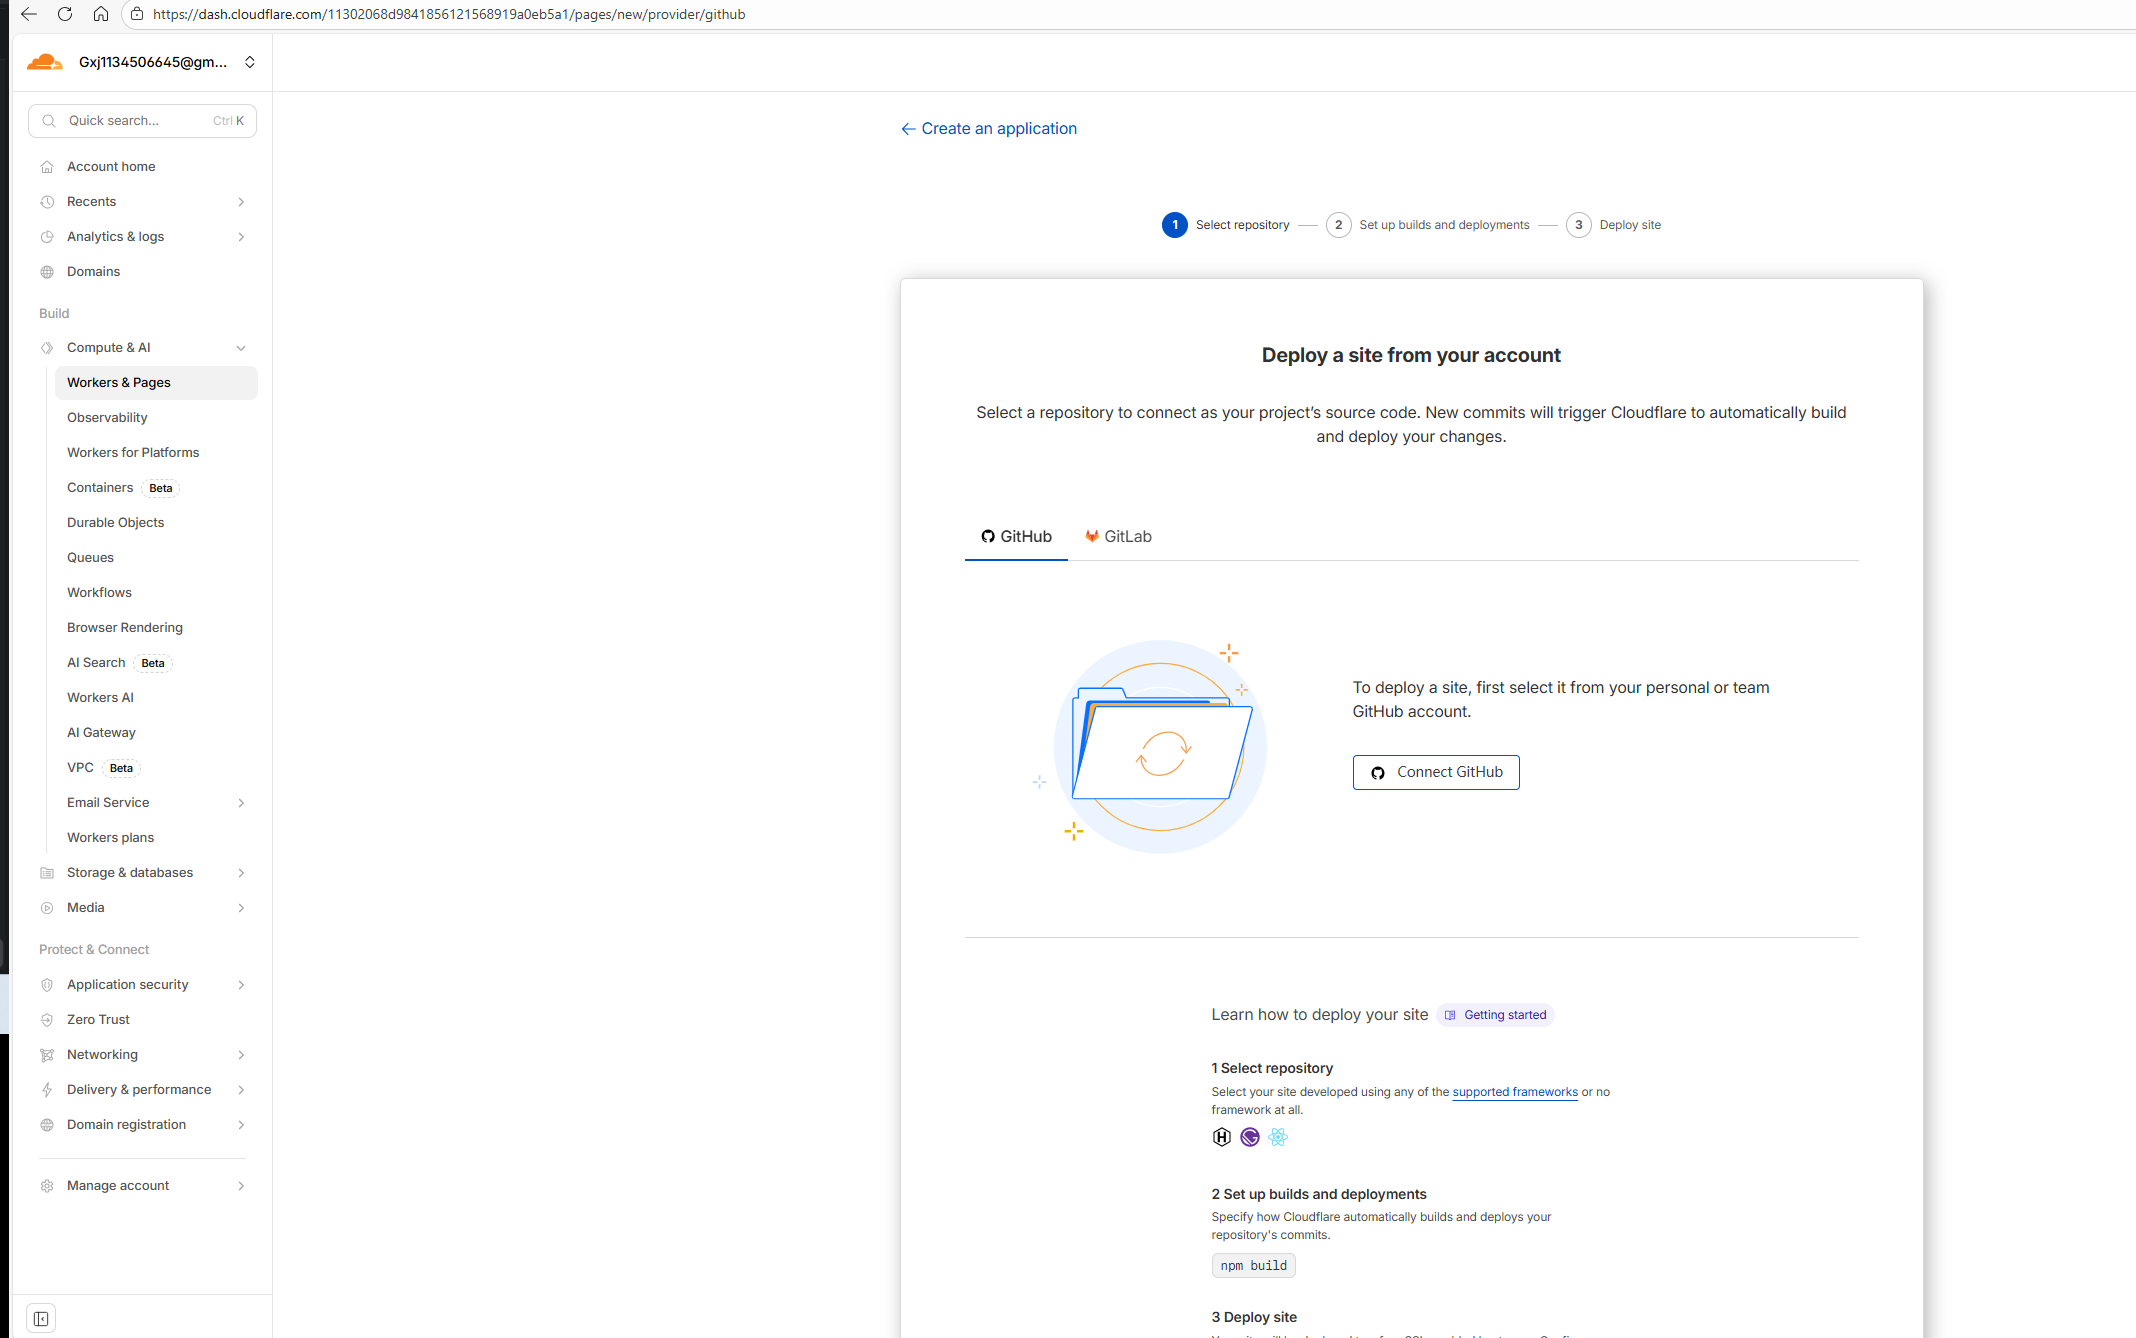
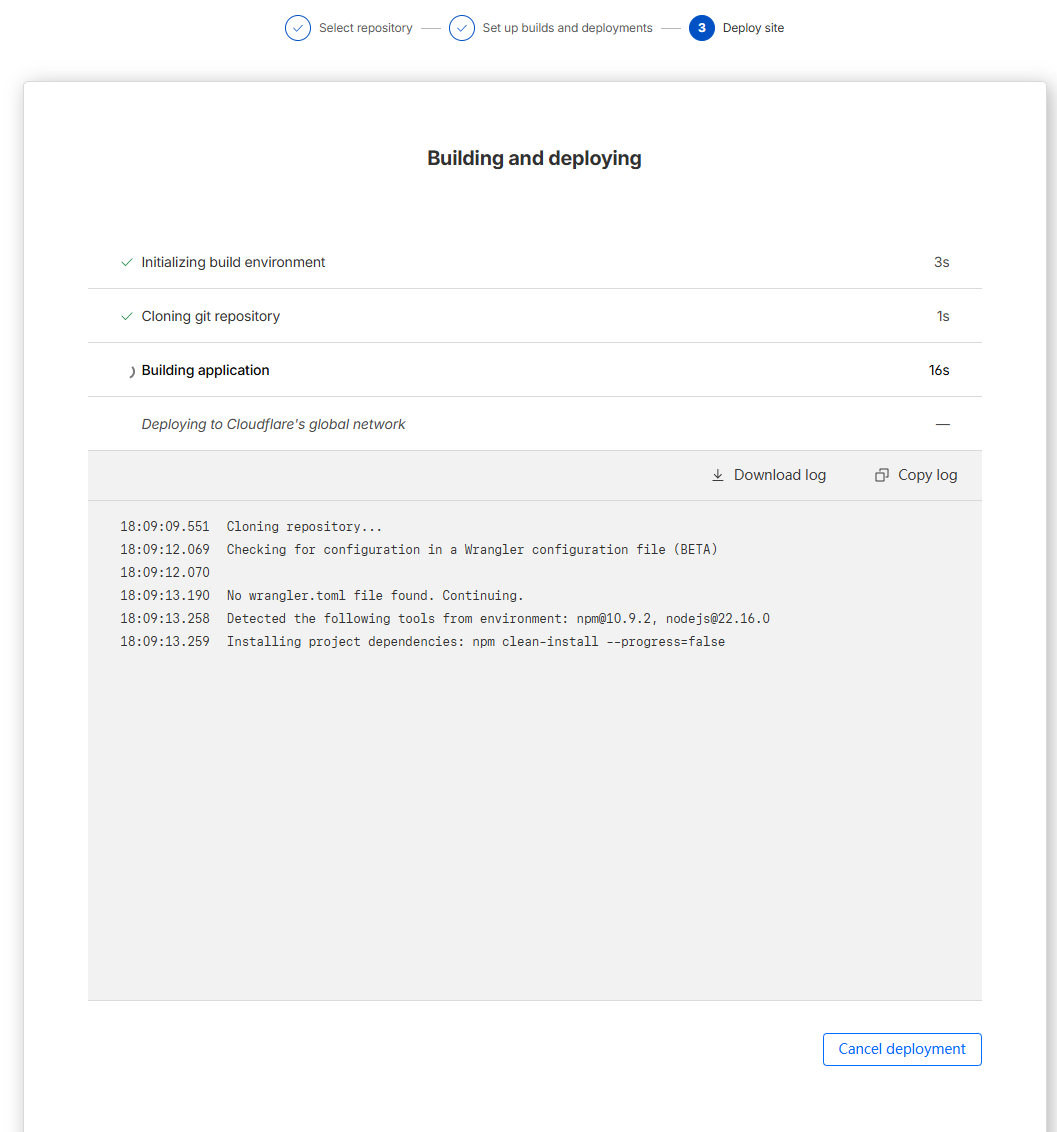
4. Connect Cloudflare Pages
Option A: Cloudflare Dashboard (recommended first time)
- Log in: https://dash.cloudflare.com
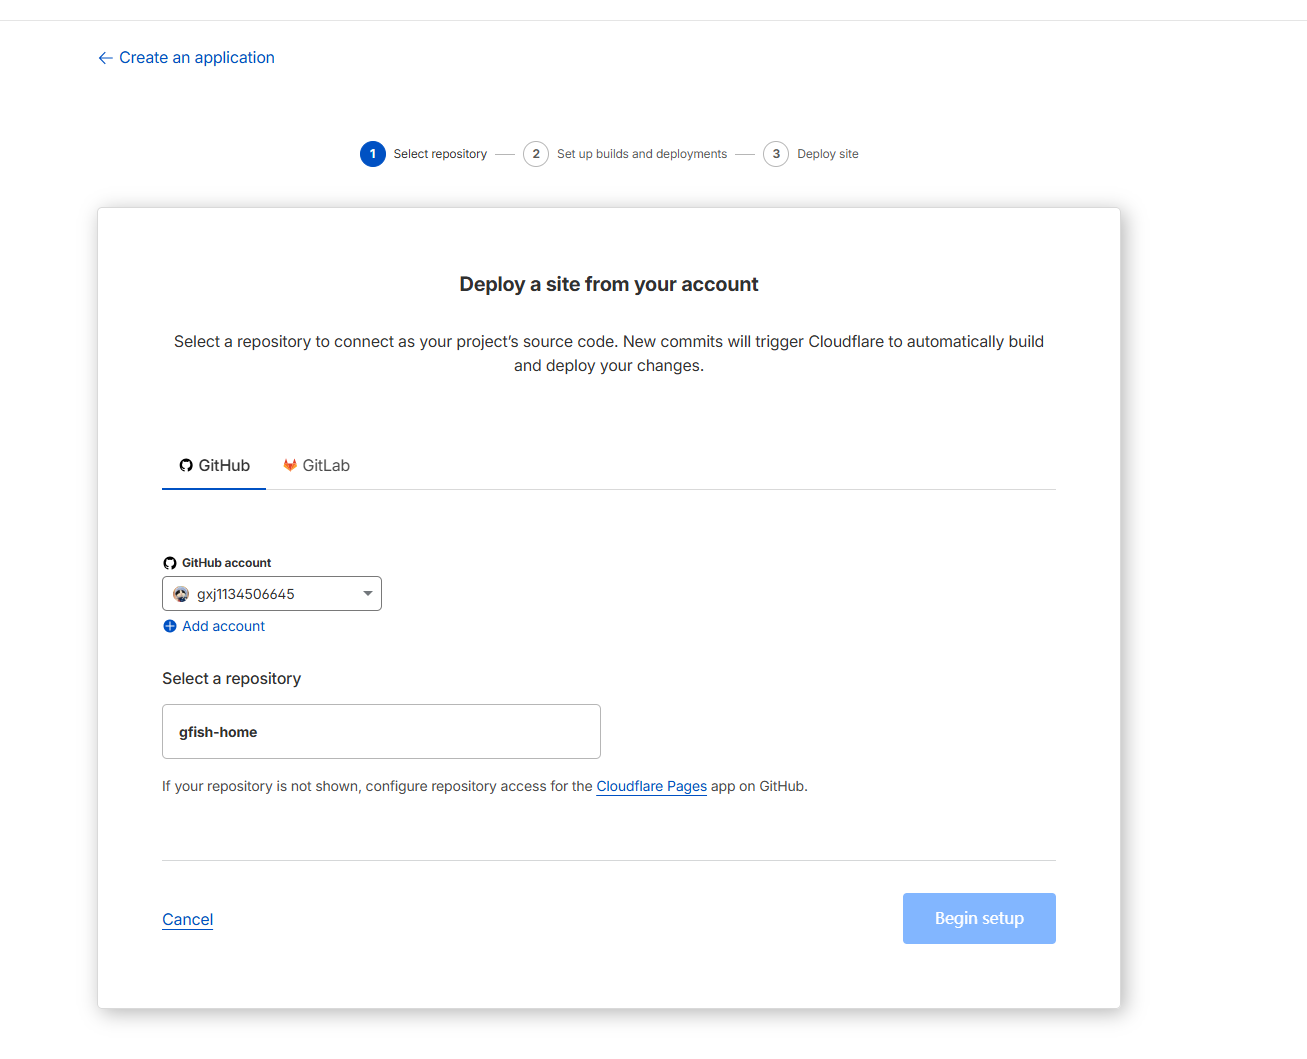
- “Workers & Pages” -> “Create application” -> “Pages” -> “Connect to Git”
- Select your GitHub repo and authorize
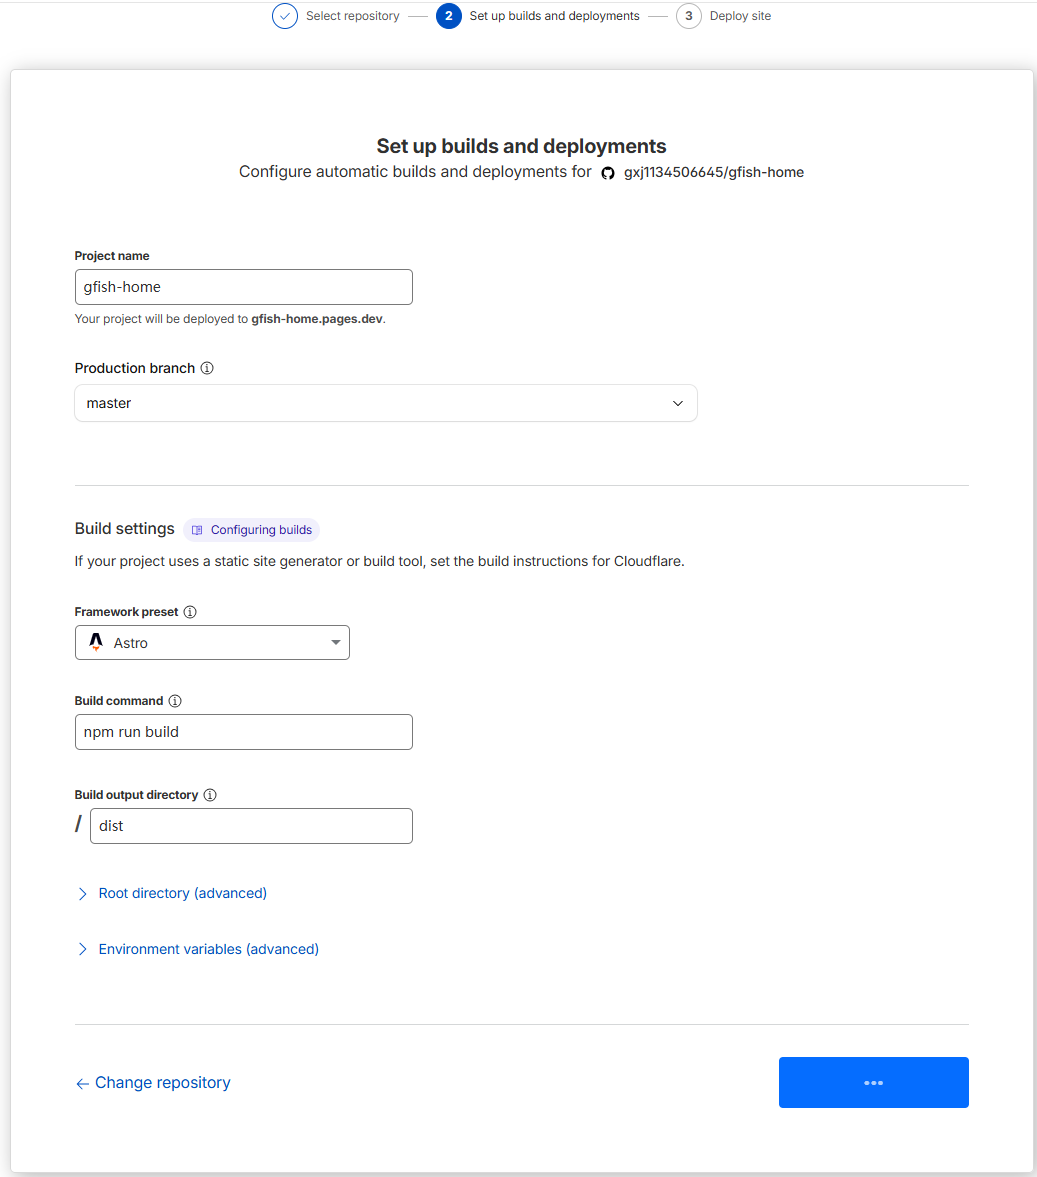
- Build settings:
- Build command:
npm run build - Output directory:
dist - Node version: latest LTS (e.g. 20)
- Build command:
- Click “Save and Deploy”

Option B: Wrangler CLI (for advanced users)
# install Wrangler
npm install -g wrangler

# login
wrangler login

# deploy
wrangler pages deploy dist --project-name=your-project-name
5. Custom domain (optional)
If you have your own domain:
- Go to your Pages project
- “Custom domains” -> “Set up a custom domain”
- Enter your domain (e.g.
blog.yourdomain.com) - Configure DNS records as instructed
- Wait for SSL to be issued
Within minutes your site is live:
- default domain:
https://your-project.pages.dev - custom domain:
https://your-custom-domain.com
6. Auto deploy
Cloudflare Pages watches your Git pushes:
- push to main triggers production deploy
- pull requests get preview URLs
- deployment history is visible in the dashboard
Step 6: Add advanced features
1. Full-text search
Use Pagefind:
npm install -D pagefind
Add a build hook:
{
  "scripts": {
    "build": "astro build && pagefind dist"
  }
}
Add a search box:
<script is:inline src="/pagefind/pagefind.js"></script>

<input id="search" type="search" placeholder="Search..." />

<script>
  const searchBox = document.getElementById('search');
  searchBox.addEventListener('input', (e) => {
    pagefind.search(e.target.value);
  });
</script>
2. Reading progress bar
src/components/ProgressBar.astro:
<div id="progress-bar"></div>

<style>
  #progress-bar {
    position: fixed;
    top: 0;
    left: 0;
    width: 0%;
    height: 4px;
    background: linear-gradient(90deg, #667eea 0%, #764ba2 100%);
    transition: width 0.1s;
    z-index: 1000;
  }
</style>

<script>
  window.addEventListener('scroll', () => {
    const winScroll = document.body.scrollTop || document.documentElement.scrollTop;
    const height = document.documentElement.scrollHeight - document.documentElement.clientHeight;
    const scrolled = (winScroll / height) * 100;
    document.getElementById('progress-bar').style.width = scrolled + '%';
  });
</script>
3. RSS feed
Install RSS:
npx astro add rss
Create src/pages/rss.xml.js:
import rss from '@astrojs/rss';
import { getCollection } from 'astro:content';

export async function GET(context) {
  const posts = await getCollection('blog');
  return rss({
    title: 'My Blog',
    description: 'My tech blog RSS Feed',
    site: context.site,
    items: posts.map(post => ({
      title: post.data.title,
      pubDate: post.data.pubDate,
      description: post.data.description,
      link: `/blog/${post.slug}/`,
    })),
  });
}
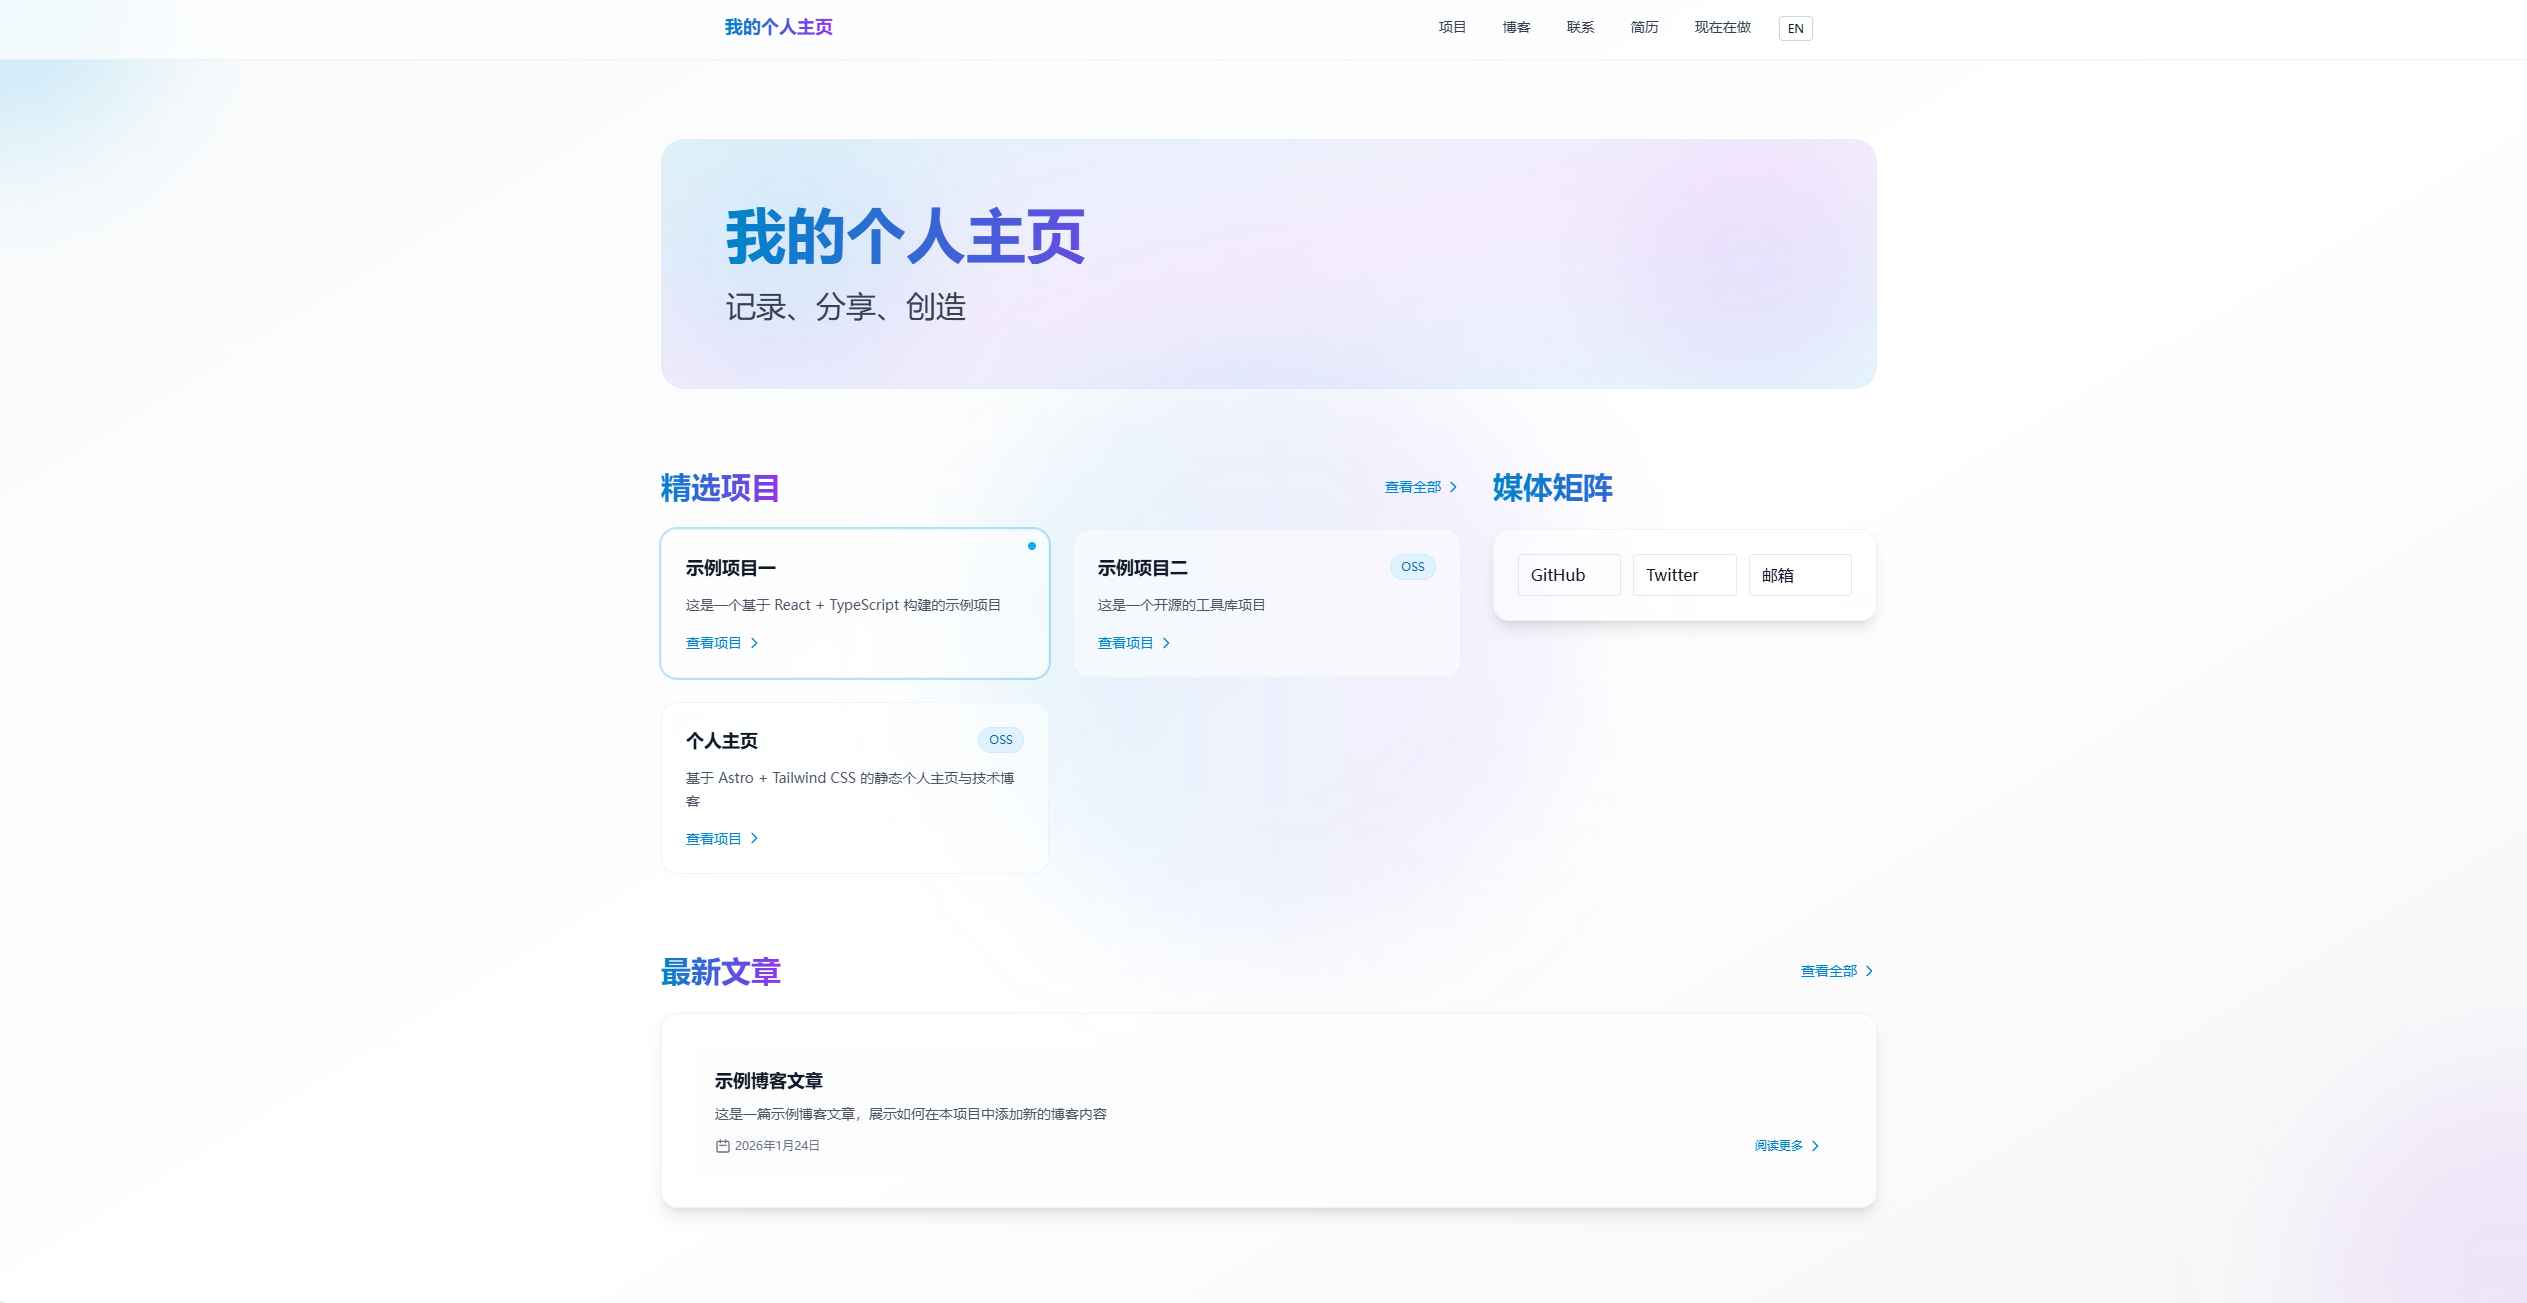
gfish Homepage: what I built
Using the stack above, I built my own site: gfish-home-public. It includes:
Core features:
- Bilingual (zh/en)
- Full-text search (Pagefind)
- Blog system (MDX + Content Collections)
- Project cards
- Reading progress bar
- Dark mode
- Breadcrumbs
- Back-to-top
- RSS
- SEO (JSON-LD, Open Graph)
Tech highlights:
- Astro 4.5.0 + Vite
- Tailwind CSS + custom theme
- TypeScript type safety
- Zod validation
- Responsive design
- Accessibility (WCAG 2.1 AA)
- Cloudflare Pages CDN
- Wrangler automation
Project: https://github.com/gxj1134506645/gfish-home-public
If this helps, feel free to star it.
Live preview: https://gfish.pages.dev (example URL, replace with your actual)

Summary and outlook
From this guide, you now know:
- How to bootstrap an Astro project
- How to deploy free on Cloudflare Pages
- How to customize a personal homepage
- How to add advanced features
A professional personal site is your digital home. It helps you:
- record and share your growth
- showcase projects and skills
- build your personal brand
- connect with like-minded developers
Cloudflare Pages vs other options: Compared to GitHub Pages and Vercel, Cloudflare Pages offers:
- true global CDN (290+ PoPs)
- unlimited free bandwidth
- faster deployments
- edge function support
Next steps:
- Add comments (Giscus, Utterances)
- Add analytics (Cloudflare Web Analytics, Umami)
- Support i18n
- Update content regularly
- Optimize SEO and performance
- Try Pages Functions for dynamic features
References
Astro docs: https://docs.astro.build
Cloudflare Pages docs: https://developers.cloudflare.com/pages
Wrangler CLI docs: https://developers.cloudflare.com/workers/wrangler
Tailwind CSS docs: https://tailwindcss.com/docs
Pagefind: https://pagefind.app
My GitHub repo: https://github.com/gxj1134506645/gfish-home-public
欢迎关注公众号FishTech Notes,一块交流使用心得